

Table of Contents
Servo Motor Control with Arduino is one of the most important beginner robotics projects for students interested in electronics, programming, and automation. In this Grade 8 STEM Activities project, students learn how to control the position of a servo motor using a potentiometer and an Arduino Uno board.
Unlike ordinary DC motors that continuously rotate when power is supplied, servo motors can move to a specific angle with remarkable precision. This ability makes them an essential component in robotics, automation systems, robotic arms, smart devices, and engineering projects.
This project combines hardware assembly and software programming, giving students practical experience with Arduino coding, analog sensors, and actuator control. Through hands-on experimentation, learners develop a deeper understanding of how modern robotic systems operate.
This Servo Motor Control with Arduino project helps students understand how motors, sensors, and programming work together in real-world robotics applications.
What is a Servo Motor?
A servo motor is a specialized motor designed to provide accurate position control. It can rotate to a desired angle and maintain that position until a new command is received.
Most servo motors can rotate between:
- 0°
- 90°
- 180°
Unlike traditional motors that spin continuously, servo motors are designed for controlled movement. This makes them ideal for projects where precision is important.
Servo motors are widely used in:
- Robotic arms
- Industrial automation
- CNC machines
- Drones
- Camera stabilization systems
- Educational robotics projects
A standard servo motor contains three wires:
- Red Wire – Power Supply (5V)
- Black/Brown Wire – Ground (GND)
- Yellow/Orange Wire – Control Signal
The control signal wire receives instructions from the Arduino and determines the motor’s position.
Why Use Servo Motors Control with Arduino in Robotics?
Servo motors are extremely popular in robotics because they provide accurate movement and positioning.
Consider a robotic arm picking up an object. The arm must stop at exact positions to grip and place objects correctly. A normal DC motor cannot easily perform this task because it rotates continuously.
Servo motors solve this problem by allowing the Arduino to specify an exact angle for movement.
Benefits of servo motors include:
- High positional accuracy
- Easy programming
- Compact size
- Low power consumption
- Smooth movement
- Excellent reliability
These advantages make servo motors one of the most important components in educational robotics.
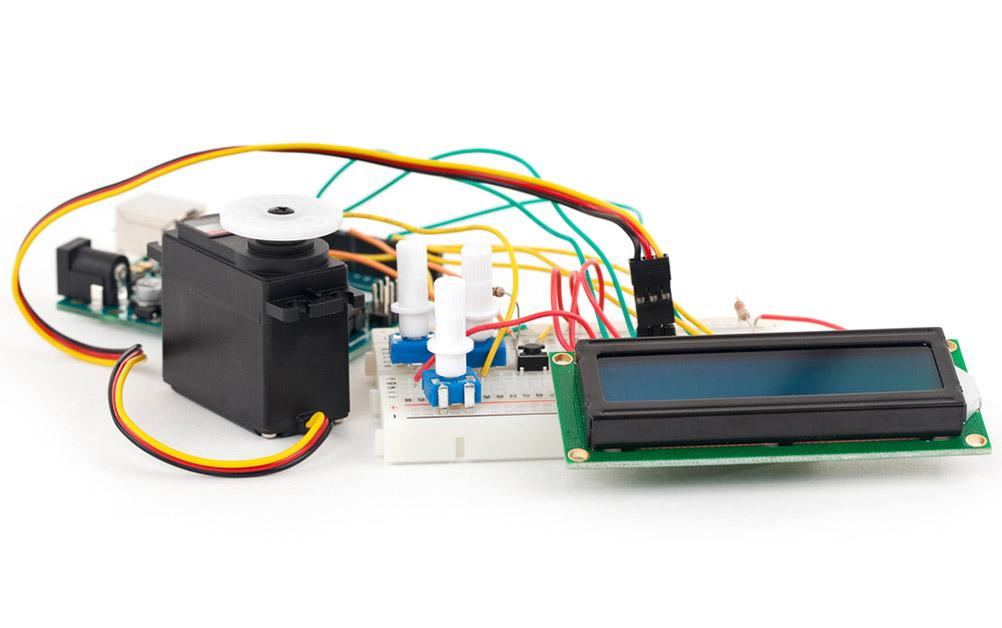
Components Required for Servo Motors Control with Arduino
To perform this Servo Motor Control with Arduino project, students need the following components:
| Component | Quantity |
|---|---|
| Arduino Uno | 1 |
| Servo Motor (SG90) | 1 |
| Potentiometer | 1 |
| Breadboard | 1 |
| Jumper Wires | Multiple |
| USB Cable | 1 |
These components are commonly available in STEM learning kits and robotics laboratories.


Understanding the Potentiometer
A potentiometer is a variable resistor that allows users to manually adjust voltage levels.
It consists of three terminals:
- One terminal connected to Ground
- One terminal connected to 5V
- A center terminal connected to Arduino Analog Pin A0
When the knob is rotated, the voltage at the center terminal changes. Arduino reads this changing voltage and converts it into a digital value ranging from 0 to 1023.
The potentiometer acts as an input device that allows users to control the servo motor position dynamically.
Without a potentiometer, users would need to manually edit the code each time they wanted to change the servo angle.


Circuit Connections
Proper wiring is essential for the successful operation of this project.
Potentiometer Connections
| Potentiometer Pin | Arduino Connection |
|---|---|
| Left Pin | GND |
| Center Pin | A0 |
| Right Pin | 5V |
Servo Motor Connections
| Servo Wire | Arduino Connection |
|---|---|
| Black/Brown | GND |
| Red | 5V |
| Yellow/Orange | Pin 9 |
After completing the connections, connect the Arduino board to a computer using a USB cable.
The system is now ready for programming.
Arduino Programming
Arduino programming plays a crucial role in controlling the servo motor.
The project begins by including the Servo Library, which provides functions specifically designed for servo control.
The Arduino continuously reads the analog value coming from the potentiometer.
Since the potentiometer generates values between 0 and 1023, the program must convert those values into servo angles ranging from 0° to 180°.
The converted angle is then sent to the servo motor.
The entire process repeats continuously, allowing the motor to respond instantly whenever the potentiometer is rotated.
This creates smooth and real-time motor movement.
Mapping Analog Values to Servo Angles
One of the most important concepts in this project is value mapping.
The potentiometer produces values ranging from:
- Minimum = 0
- Maximum = 1023
The servo motor requires:
- Minimum Angle = 0°
- Maximum Angle = 180°
Arduino uses the map() function to convert one range into another.
Example Conversion Table
| Potentiometer Value | Servo Angle |
|---|---|
| 0 | 0° |
| 256 | 45° |
| 512 | 90° |
| 768 | 135° |
| 1023 | 180° |
This conversion allows smooth servo movement based on the potentiometer position.
Working Principle
The operation of this project is straightforward.
Step 1: Potentiometer Rotation
The user rotates the potentiometer knob.
Step 2: Analog Reading
Arduino reads the changing voltage through Analog Pin A0.
Step 3: Value Conversion
The analog value is converted into an angle between 0° and 180°.
Step 4: Servo Movement
Arduino sends the angle to the servo motor.
Step 5: Continuous Updates
The process repeats continuously, resulting in real-time motor control.
As the potentiometer moves, the servo motor follows the movement instantly.
Controlling Multiple Servo Motors
The same concept can be expanded to control multiple servo motors.
Instead of connecting one servo motor, students can connect two or more servos to different PWM pins.
For example:
- Servo 1 → Pin 9
- Servo 2 → Pin 10
Both servos can respond to a single potentiometer or multiple potentiometers depending on the project requirements.
This technique is commonly used in:
- Robotic arms
- Pick-and-place robots
- Industrial automation systems
- Mechanical control systems
Learning to control multiple servo motors prepares students for advanced robotics projects.
Real-World Applications
Servo Motor Control with Arduino is widely used across industries.
Robotic Arms
Servo motors provide accurate joint movement required for object manipulation.
Automatic Gates
Modern automatic gates use servo motors to open and close precisely.
Camera Pan-Tilt Systems
Security cameras often use servo motors for directional control.
Drones
Servo mechanisms are used to control movement and stabilization systems.
Educational Robotics
Most robotics learning kits include servo motors because they are easy to program and highly effective for demonstrating motion control.
Grade 8 STEM Activities Learning Outcomes
This project is highly valuable as one of the most engaging Grade 8 STEM Activities.
Students learn:
- Arduino programming fundamentals
- Analog sensor interfacing
- Servo motor operation
- Electronics basics
- Robotics principles
- Problem-solving techniques
- Engineering design concepts
- Hardware and software integration
By completing this activity, students gain practical experience that strengthens both technical and analytical skills.
Why This Project Matters
Modern technology relies heavily on automation and robotics.
Understanding Servo Motor Control with Arduino introduces students to the same concepts used in:
- Industrial robots
- Smart manufacturing systems
- Home automation
- Artificial intelligence hardware
- Autonomous vehicles
The project serves as a strong foundation for future learning in STEM and engineering fields.
Learn Robotics with RoboSiddhi STEM & Robotics
Looking for hands-on STEM education and robotics learning opportunities for students? RoboSiddhi provides innovative STEM and robotics programs designed to help learners develop practical skills in coding, electronics, automation, artificial intelligence, and engineering.
Our STEM activities encourage students to learn through real-world projects using Arduino, sensors, robotics kits, IoT devices, and programming platforms. These activities help students improve problem-solving abilities, critical thinking skills, creativity, and technical knowledge while making learning engaging and interactive.
Whether students are exploring basic electronics or advanced robotics projects, RoboSiddhi offers structured learning experiences that align with modern educational requirements and future technology trends.
Explore more exciting STEM projects, robotics activities, and Arduino tutorials with RoboSiddhi and start your journey into the world of innovation and technology today.
Learn Robotics with RoboSiddhi
At RoboSiddhi, students explore practical robotics and coding projects through hands-on STEM learning. From Arduino programming and sensor integration to automation and AI-based applications, RoboSiddhi helps learners develop real-world technical skills.
Our robotics programs include:
- Arduino and Embedded Systems
- IoT and Smart Automation Projects
- Sensor-Based Robotics
- Artificial Intelligence Fundamentals
- Coding and Programming for Students
- Grade 8 STEM Activities and Project-Based Learning
The Servo Motor Control with Arduino project is one of many exciting activities designed to help students understand electronics, coding, and robotics through practical experimentation.
Add this paragraph near the conclusion
Servo Motor Control with Arduino is one of the most engaging robotics projects for middle school learners. Through Servo Motor Control with Arduino, students learn how analog input devices such as potentiometers can precisely control motor movement. This Servo Motor Control with Arduino activity introduces important concepts like PWM signals, angle mapping, actuator control, and real-world robotics applications. By completing this Servo Motor Control with Arduino project, students gain practical experience in electronics, programming, and automation while developing problem-solving skills through hands-on learning.
Conclusion
Servo Motor Control with Arduino is an excellent Grade 8 STEM Activities project that combines coding, electronics, and robotics into a single hands-on learning experience. By using a potentiometer to control a servo motor, students gain valuable knowledge about analog inputs, motor control systems, and Arduino programming.
The project demonstrates how electronic components communicate and work together to create precise mechanical movement. These concepts form the basis of countless robotics and automation systems used around the world today.
Whether used in a classroom, STEM laboratory, or home learning environment, this project provides an engaging introduction to robotics and prepares students for more advanced engineering challenges in the future.