


Table of Contents
Introduction
STEM education helps students develop critical thinking, creativity, and problem-solving skills through hands-on learning experiences. One of the most engaging Amazing Grade 7 STEM Activities is the Servo Motor with Arduino Project, which introduces students to robotics, programming, electronics, and automation.
In this project, students learn how to control a servo motor using an Arduino board. Unlike ordinary DC motors that continuously rotate, a servo motor can move to specific angles with high precision. This makes servo motors ideal for robotics, automation systems, robotic arms, and smart devices.
The Servo Motor with Arduino project is beginner-friendly and provides an excellent introduction to Arduino programming and motor control. By combining hardware and software, students gain practical experience while understanding how modern automated systems operate.
What is a Servo Motor with Arduino?
A servo motor is a special type of motor designed for precise position control. It can rotate to a specific angle based on signals received from a controller.
When connected to an Arduino board, the servo motor receives instructions from the Arduino program and moves accordingly. The Arduino sends control signals through a digital pin, allowing the servo motor to rotate to different positions such as 0°, 90°, or 180°.
The Servo Motor with Arduino project helps students understand how microcontrollers communicate with actuators to perform specific actions. This concept is widely used in robotics and industrial automation.
Unlike regular motors that continuously spin, servo motors provide accurate movement control, making them useful in applications where precision is important.
Why This Project is Perfect for Grade 7 STEM Activities
The Servo Motor with Arduino project combines multiple STEM disciplines into one practical activity.
Science concepts help students understand electricity, motion, and mechanical systems. Technology is represented by the Arduino board and programming software. Engineering is involved in designing and assembling the circuit, while mathematics can be applied when calculating movement angles and rotations.
As one of the most effective Grade 7 STEM Activities, this project encourages students to experiment, analyze results, and improve their designs. It also develops logical thinking and introduces learners to the exciting world of robotics.
Hands-on projects such as this help students connect classroom knowledge with real-world applications, making learning more meaningful and engaging.
Components Required
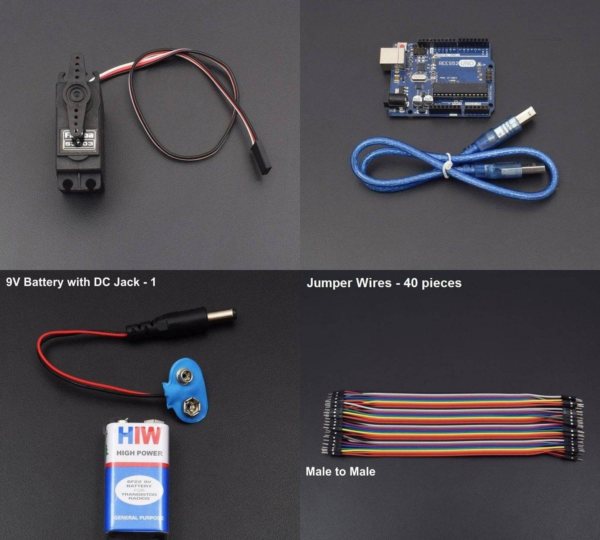
The following components are required to build the Servo Motor with Arduino project:
- Arduino Uno Board
- Servo Motor
- Jumper Wires
- USB Cable
- Breadboard (optional)
- Computer with Arduino IDE Installed
Each component plays an important role in the project.
The Arduino Uno acts as the controller and sends instructions to the servo motor. The servo motor performs the movement based on the received signals. Jumper wires establish electrical connections between the components, while the Arduino IDE is used to write and upload the code.
These components are commonly used in educational robotics projects and provide an excellent foundation for learning electronics and automation.
Understanding Servo Motor Working Principle
A servo motor works by receiving control signals from a microcontroller such as Arduino.
The motor contains an internal control circuit that continuously monitors its position. When the Arduino sends a command, the servo motor rotates to the specified angle and holds that position until a new command is received.
For example:
- 0° moves the servo to its starting position.
- 90° moves the servo to the middle position.
- 180° moves the servo to its maximum position.
The servo motor used in this project smoothly rotates between 0° and 180°, demonstrating precise position control.
This ability to move accurately makes servo motors highly valuable in robotics, automation systems, and intelligent machines.
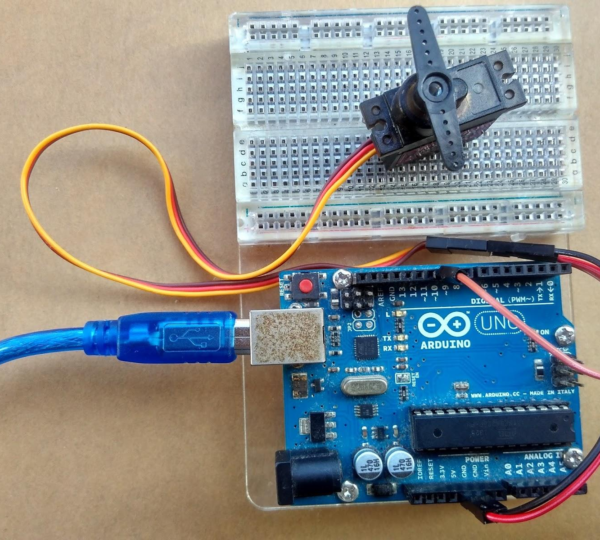
Servo Motor Wiring Connections


Correct wiring is essential for successful servo motor operation.
Most servo motors have three wires that must be connected properly.
Connecting the Signal Wire
The orange wire is the signal wire.
This wire carries control signals from the Arduino to the servo motor. In this project, the signal wire is connected to Arduino digital pin 9.
Pin 9 is commonly used because it supports PWM (Pulse Width Modulation), which helps control servo movement accurately.
Connecting the Power Supply
The red wire provides power to the servo motor.
This wire is connected to the 5V pin of the Arduino board.
The power connection allows the servo motor to operate and respond to commands from the Arduino.
Connecting the Ground Connection
The black wire is the ground wire.
This wire must be connected to the GND pin on the Arduino board.
Without a proper ground connection, the servo motor may not function correctly.
Ensuring correct connections for the signal, power, and ground wires is essential for reliable performance.
Arduino Code Explanation


Programming is an important part of the Servo Motor with Arduino project.
The Arduino IDE is used to write, verify, and upload the code to the Arduino board.
Including the Servo Library
Before controlling a servo motor, the Servo Library must be included in the Arduino program.
This library contains predefined functions that make servo control simple and efficient.
Without the Servo Library, the Arduino cannot communicate properly with the servo motor.
Defining the Servo Pin
After including the library, the servo motor pin must be defined.
In this project, pin 9 is assigned as the servo control pin.
This tells the Arduino where to send the control signals required for motor movement.
Controlling Servo Rotation
Once the setup is complete, commands are used to move the servo motor to specific angles.
The servo can rotate smoothly between 0° and 180°.
Students can also modify the code to move the servo between different angles such as 0° and 90° to experiment with motor control.
This flexibility allows learners to understand how programming influences physical movement.
Testing the Servo Motor Project

After completing the wiring and uploading the code, the project can be tested.
Follow these steps:
- Verify the code in the Arduino IDE.
- Select the correct Arduino port.
- Upload the code to the Arduino board.
- Observe the servo motor movement.
Expected Result:
- The servo motor rotates smoothly from 0° to 180°.
- The motor pauses briefly before changing position.
- The movement demonstrates successful communication between the Arduino and servo motor.
If the servo motor does not move, students should check the wiring, power supply, and uploaded code.
Testing helps learners identify and solve problems while improving troubleshooting skills.
Real-World Applications of Servo Motors


Servo motors are widely used in modern technology because of their precision and reliability.
Robotics
Servo motors are commonly used in robotic arms, robotic grippers, and autonomous robots.
They provide accurate movement control required for complex robotic tasks.
Smart Automation Systems
Many automated systems use servo motors to control doors, gates, valves, and mechanical components.
Their precise movement improves efficiency and reliability.
Industrial Machines
Manufacturing equipment frequently uses servo motors for positioning and motion control.
They help ensure consistent and accurate production processes.
RC Vehicles
Remote-controlled cars, airplanes, and drones use servo motors to control steering and movement.
Their responsiveness makes them ideal for these applications.
Smart Home Devices
Servo motors are increasingly used in smart home automation systems where precise movement is required.
Benefits of Learning Servo Motor Projects
Servo motor projects provide numerous educational benefits.
Students learn:
- Arduino programming
- Electronics fundamentals
- Robotics concepts
- Automation principles
- Engineering design
- Problem-solving techniques
Hands-on activities help students understand how theoretical concepts are applied in practical situations.
They also encourage creativity and innovation by allowing students to experiment with different ideas and solutions.
Grade 7 STEM Activities Using Arduino
Arduino-based projects are among the most popular Grade 7 STEM Activities because they combine coding with electronics.
After completing the Servo Motor with Arduino project, students can explore additional activities such as:
- Robotic Arm Projects
- Automatic Door Systems
- Smart Parking Models
- Obstacle Avoiding Robots
- Solar Tracking Systems
- Automated Sorting Machines
These projects help students develop advanced technical skills while building confidence in science and technology.
Through experimentation and project-based learning, students gain valuable experience that prepares them for future STEM careers.
RoboSiddhi STEM Learning Programs
RoboSiddhi focuses on making STEM education interactive, practical, and engaging.
Through hands-on projects such as the Servo Motor with Arduino activity, students learn essential concepts in robotics, electronics, programming, and engineering.
RoboSiddhi encourages students to move beyond textbook learning by building real working projects. This approach helps learners develop creativity, critical thinking, communication, and collaboration skills.
By participating in STEM activities and robotics projects, students gain confidence and become better prepared for future technological challenges.
Frequently Asked Questions
What is a servo motor?
A servo motor is a motor designed for precise position control and can rotate to specific angles based on control signals.
Why is a Servo Library required in Arduino?
The Servo Library provides functions that allow Arduino to communicate and control servo motors easily.
Which pin is used in this project?
Pin 9 is used to connect the servo motor signal wire.
Can a servo motor rotate 360 degrees?
Standard servo motors usually rotate between 0° and 180°. Special continuous rotation servos can rotate 360 degrees.
Is this project suitable for beginners?
Yes. The Servo Motor with Arduino project is an excellent beginner-friendly activity for learning robotics and programming.
Why is this considered a Grade 7 STEM Activity?
The project combines science, technology, engineering, and mathematics through practical experimentation and problem-solving.
Conclusion
The Servo Motor with Arduino project is one of the most valuable Grade 7 STEM Activities for introducing students to robotics, electronics, and programming. By learning how to control a servo motor using Arduino, students gain practical experience in both hardware and software development.
The project demonstrates the importance of precise motor control and highlights real-world applications in robotics, automation, smart devices, and industrial systems. Through hands-on learning and experimentation, students develop technical skills that form a strong foundation for future STEM education and innovation.