
Discover fun Grade 3 STEM activities with Cayo Board LED programming using RoboSiddhi software. Learn coding basics, LEDs, setup loop, main loop, and beginner robotics programming for kids.
Grade 3 STEM Activities: Cayo Board LED Programming for Kids
Grade 3 STEM activities help children explore robotics, electronics, and coding through practical learning and fun experiments. STEM stands for Science, Technology, Engineering, and Mathematics, and these activities encourage children to build creativity, logical thinking, and problem-solving skills.
In this exciting Grade 3 STEM activities project, children learn how to program the Cayo Board using RoboSiddhi software to turn ON all LEDs through block-based coding.
This beginner robotics project introduces students to:
- Coding basics
- LED programming
- Robotics boards
- Setup loop and main loop
- Block-based coding
The activity makes robotics learning simple and interactive for young learners.
What is a Cayo Board?
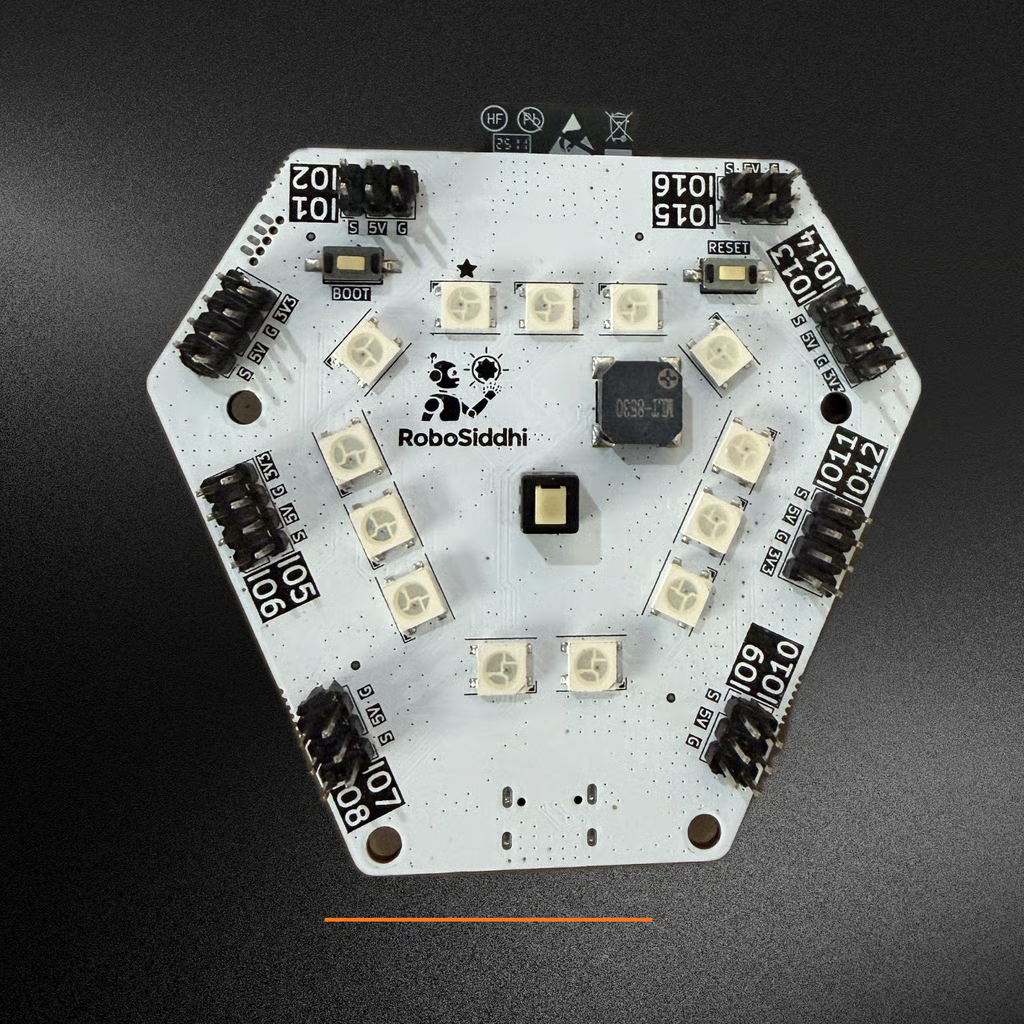
The Cayo Board is a beginner robotics and electronics board used in STEM learning and robotics projects.
The board contains:
- LEDs
- Buzzer
- Buttons and switches
- Microcontroller
- Type-C charging port
The microcontroller acts as the brain of the board and controls all electronic operations.
This Grade 3 STEM activities project helps children understand how coding controls electronic components like LEDs.
What is RoboSiddhi Software?
RoboSiddhi provides robotics learning tools, STEM kits, and educational software for students and schools.
RoboSiddhi software allows children to:
- Program the Cayo Board
- Use block-based coding
- Learn robotics easily
- Control LEDs and sensors
- Explore beginner programming concepts
The software is beginner-friendly and helps students understand coding visually.
Materials Needed
This Grade 3 STEM activities project requires:
- Cayo Board
- Type-C USB cable
- Computer or laptop
- RoboSiddhi software
These materials help children perform beginner robotics coding activities safely and easily.
How to Connect the Cayo Board
Step 1: Connect the Cable
Use the Type-C cable to connect the Cayo Board to the computer.
Step 2: Turn ON the Board
Press the power switch on the Cayo Board.
A green LED on the board will glow.
Step 3: Check LED Color
- Blue LED pattern = Normal mode
- Purple LED pattern = Python mode
If the board shows purple color, reset the board before continuing.
Opening RoboSiddhi Software
After connecting the board:
- Open RoboSiddhi software
- Select the Cayo Board module
- Choose Blocks Mode
- Select wired connection
- Choose the correct COM port
- Wait for the green blinking light
The blinking light shows the board is ready for coding.
Understanding Setup Loop and Main Loop
This Grade 3 STEM activities lesson introduces children to basic coding structures.
Setup Loop
The setup loop runs only one time when the program starts.
It is used for:
- Initial setup
- Hardware connections
- Starting LEDs and sensors
Main Loop
The main loop runs continuously again and again.
It controls:
- LED operations
- Robot actions
- Repeated activities
Children learn that LEDs must be placed inside the main loop to stay ON continuously.
How to Turn ON All LEDs
Step 1: Open Events Section
Find the Events section in RoboSiddhi software.
Step 2: Drag the Main Loop
Use the main loop block.
Step 3: Add “Set All LEDs” Block
Drag the “Set All LEDs” block inside the main loop.
Step 4: Select LED Color
Choose your favorite LED color.
The tutorial uses red LEDs, but other colors can also be selected.
Step 5: Run the Program
Click the Run button.
All LEDs on the Cayo Board will glow together and remain ON continuously.
Science and Coding Behind the Activity
This Grade 3 STEM activities project teaches children how software controls hardware.
The microcontroller receives coding instructions and controls:
- LEDs
- Buzzers
- Sensors
- Other electronic components
Children begin understanding how robotics and programming work together in STEM learning.
STEM Learning Benefits
This Grade 3 STEM activities project helps children:
- Learn beginner coding
- Understand robotics basics
- Improve logical thinking
- Explore electronics practically
- Build creativity and innovation
Hands-on robotics projects make coding easier and more exciting for students.
RoboSiddhi – Helping Kids Learn Robotics and STEM
RoboSiddhi Robotics Store helps children learn robotics, electronics, and STEM education through practical learning materials and beginner robotics kits.
RoboSiddhi provides:
- Robotics kits
- STEM activity materials
- Beginner coding boards
- Electronics components
- Sensors, LEDs, and motors
- DIY science project tools
RoboSiddhi supports schools and students by making robotics learning simple and accessible.
Why Robotics Labs Are Important in Schools
Robotics labs help children learn through practical experiences instead of only theory.
A robotics lab helps students:
- Improve problem-solving skills
- Learn coding and electronics
- Build creativity and innovation
- Understand technology practically
- Develop teamwork and communication skills
Robotics education prepares students for future careers in:
- Robotics
- Engineering
- Artificial Intelligence
- Computer Science
- Technology
Try Beginner Coding at Home
Children can start learning robotics and coding at home using beginner-friendly STEM kits and robotics boards.
Simple LED programming projects help students understand:
- Coding logic
- Electronics
- Robotics basics
- Problem-solving
This makes Grade 3 STEM activities more engaging and enjoyable for young learners.
Final Thoughts
Grade 3 STEM activities help children explore science, coding, and robotics through practical learning. This Cayo Board LED programming activity introduces children to block-based coding and beginner robotics in a simple and interactive way.
By programming LEDs using RoboSiddhi software, students learn how coding controls electronic devices and robotic systems.
Hands-on STEM projects like this inspire curiosity, creativity, and innovation while making coding and robotics easy to understand for children.