
Introduction
The Arduino DHT11 Temperature Monitoring System is an exciting IoT and embedded systems project that allows students to measure and display real-time temperature and humidity values. Using an Arduino Uno, a DHT11 sensor, and an OLED display, this project creates a compact environmental monitoring system that can be used in homes, classrooms, laboratories, and smart automation projects.
This project introduces students to sensor interfacing, I2C communication, Arduino programming, and real-time data visualization. As part of Class 10 STEM Activities, it helps learners understand how sensors collect environmental data and how microcontrollers process and display that information.
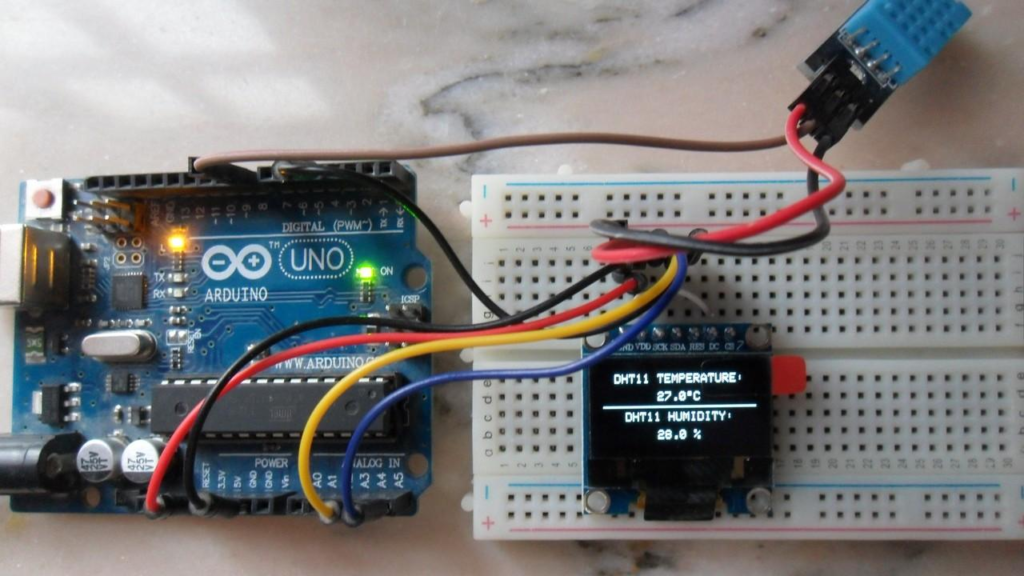
Arduino Uno connected with DHT11 sensor and OLED display for real-time temperature monitoring.
Table of Contents
YouTube Tutorial
Follow our step-by-step video tutorial to build the Arduino DHT11 Temperature Monitoring System using an Arduino Uno, DHT11 sensor, and OLED display. In this tutorial, you’ll learn how to connect the hardware components, install the required libraries, write the Arduino code, and display real-time temperature and humidity readings on an OLED screen.
What is an Arduino DHT11 Temperature Monitoring System?
An Arduino DHT11 Temperature Monitoring System is a sensor-based project that measures temperature and humidity from the surrounding environment and displays the readings on an OLED screen.
The DHT11 sensor continuously collects environmental data and sends it to the Arduino Uno. The Arduino processes the data and displays it on the OLED display in real time.
Features
- Real-time temperature monitoring
- Real-time humidity monitoring
- OLED display output
- Arduino-based programming
- Compact and portable design
- Beginner-friendly electronics project
Learning Objectives
By completing this Arduino DHT11 Temperature Monitoring System project, students will learn:
- Arduino Programming
- Sensor Interfacing
- OLED Display Communication
- I2C Protocol Basics
- Environmental Monitoring
- Embedded Systems Fundamentals
- Real-Time Data Processing
These skills provide a strong foundation for future IoT and automation projects.
Components Required
| Component | Quantity |
|---|---|
| Arduino Uno | 1 |
| DHT11 Temperature & Humidity Sensor | 1 |
| OLED Display (SSD1306) | 1 |
| Breadboard | 1 |
| Jumper Wires | Several |
| USB Cable | 1 |
Working Principle
The Arduino DHT11 Temperature Monitoring System works using three main components:
DHT11 Sensor
The DHT11 sensor measures:
- Temperature in Celsius
- Relative Humidity Percentage
Arduino Uno
The Arduino Uno:
- Reads data from the DHT11 sensor
- Processes sensor values
- Sends data to the OLED display
OLED Display
The OLED display shows:
- Temperature value
- Humidity percentage
The display updates continuously, providing real-time environmental monitoring.
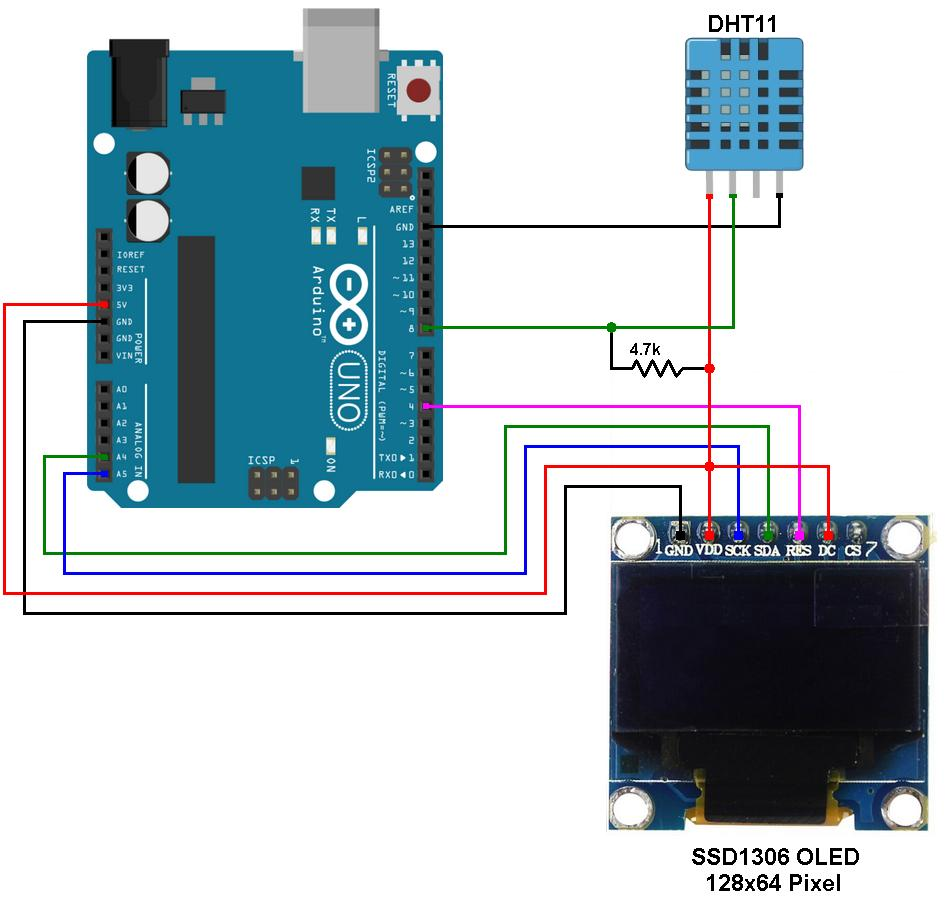
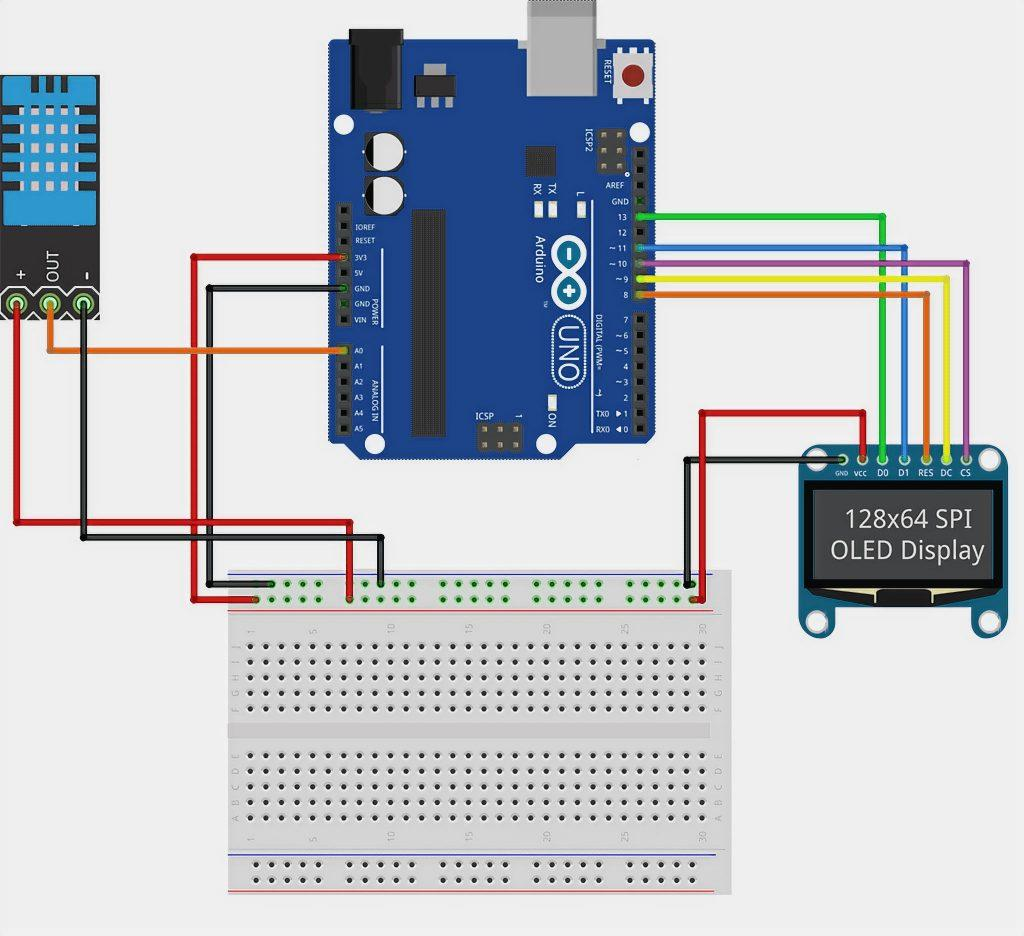
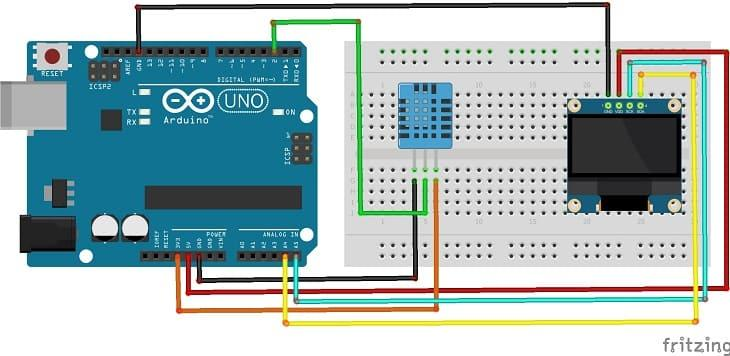
Circuit Connections
DHT11 Sensor Connections
| DHT11 Pin | Arduino Pin |
|---|---|
| Signal (S) | Digital Pin 2 |
| VCC | 5V |
| GND | GND |
OLED Display Connections
| OLED Pin | Arduino Pin |
|---|---|
| SDA | A4 |
| SCL | A5 |
| VCC | 5V |
| GND | GND |
The OLED communicates with Arduino through the I2C protocol using SDA and SCL lines.
Understanding the Libraries
Several libraries are used in the Arduino DHT11 Temperature Monitoring System.
Wire.h
Used for I2C communication between Arduino and OLED display.
Adafruit_GFX.h
Provides graphics functions for displaying text and shapes.
Adafruit_SSD1306.h
Controls the OLED display module.
DHT.h
Reads temperature and humidity values from the DHT11 sensor.
Project Algorithm
Step 1
Connect DHT11 sensor to Arduino Uno.
Step 2
Connect OLED display using I2C pins.
Step 3
Import required libraries.
Step 4
Initialize OLED display.
Step 5
Initialize DHT11 sensor.
Step 6
Read temperature and humidity values.
Step 7
Display readings on OLED screen.
Step 8
Repeat continuously for real-time monitoring.
Arduino DHT11 Temperature Monitoring System Code
#include <Wire.h>
#include <Adafruit_GFX.h>
#include <Adafruit_SSD1306.h>
#include <DHT.h>

#define SCREEN_WIDTH 128
#define SCREEN_HEIGHT 64

#define DHTPIN 2
#define DHTTYPE DHT11

DHT dht(DHTPIN, DHTTYPE);

Adafruit_SSD1306 display(
SCREEN_WIDTH,
SCREEN_HEIGHT,
&Wire,
-1
);

void setup() {

Serial.begin(9600);

dht.begin();

if(!display.begin(
SSD1306_SWITCHCAPVCC,
0x3C))
{
Serial.println("Display Not Found");
return;
}

display.clearDisplay();
display.setTextColor(WHITE);
}

void loop() {

delay(2000);

float t = dht.readTemperature();
float h = dht.readHumidity();

if (isnan(t) || isnan(h))
{
return;
}

display.clearDisplay();

display.setTextSize(1);
display.setCursor(0,10);
display.print("Temperature: ");
display.print(t);
display.println(" C");

display.setCursor(0,35);
display.print("Humidity: ");
display.print(h);
display.println(" %");

display.display();

Serial.print("Temperature: ");
Serial.println(t);

Serial.print("Humidity: ");
Serial.println(h);
}
Code Explanation
Sensor Initialization
DHT dht(DHTPIN, DHTTYPE);
Creates the DHT11 sensor object.
Display Initialization
display.begin()
Starts communication with the OLED display.
Reading Temperature
dht.readTemperature()
Reads temperature from the sensor.
Reading Humidity
dht.readHumidity()
Reads humidity from the sensor.
Displaying Data
display.print()
Shows sensor values on the OLED screen.
Project Output
After uploading the code:
- OLED displays live temperature values.
- OLED displays live humidity values.
- Values update automatically every few seconds.
- Serial Monitor also displays sensor readings.
Example Output
Temperature: 22.0 C
Humidity: 54.2 %
When room conditions change, the values update in real time.
Applications of Arduino DHT11 Temperature Monitoring System
Home Environment Monitoring
Track indoor temperature and humidity.
Smart Agriculture
Monitor greenhouse conditions.
Weather Stations
Collect environmental data.
Smart Home Automation
Control fans, coolers, and air conditioners.
Educational Projects
Learn sensor interfacing and embedded systems.
IoT Applications
Send environmental data to cloud platforms.
Why Learn STEM with RoboSiddhi?
RoboSiddhi focuses on hands-on STEM education through practical projects.
Benefits include:
- Project-Based Learning
- Arduino Programming Skills
- IoT Fundamentals
- Electronics Knowledge
- Problem-Solving Skills
- Real-World Applications
- Industry-Relevant STEM Activities
The Arduino DHT11 Temperature Monitoring System is one of the best beginner projects for learning environmental sensing and embedded systems development.
Frequently Asked Questions
What does the DHT11 sensor measure?
The DHT11 sensor measures:
- Temperature
- Humidity
Which Arduino pin is used for the DHT11 sensor?
The signal pin of the DHT11 sensor is connected to Digital Pin 2.
Which pins are used for OLED communication?
- SDA → A4
- SCL → A5
What communication protocol does the OLED use?
The OLED display uses the I2C communication protocol.
Is this project suitable for beginners?
Yes. The Arduino DHT11 Temperature Monitoring System is ideal for beginners and Class 10 STEM learners.
Can I use DHT22 instead of DHT11?
Yes. DHT22 provides higher accuracy and can be used with minor code modifications.
Conclusion
The Arduino DHT11 Temperature Monitoring System is a practical and educational project that demonstrates how sensors, displays, and microcontrollers work together to create a real-time monitoring solution. By integrating the DHT11 sensor with an OLED display and Arduino Uno, students gain hands-on experience with sensor interfacing, I2C communication, and embedded programming.
As one of the most engaging Class 10 STEM Activities, this project helps learners build strong foundations in electronics, coding, and IoT technology while solving real-world monitoring challenges.