
Learn how to build an ESP32 WiFi Controlled Street Light Project using Arduino IDE, WiFi.h library, and a web server. This Grade 9 STEM Activities tutorial teaches IoT, wireless control, and ESP32 programming.
ESP32 WiFi Controlled Street Light Project: 5 Easy Steps for Grade 9 STEM Activities
Introduction
ESP32 WiFi Controlled Street Light Project is an exciting Internet of Things (IoT) activity that demonstrates how wireless communication can be used to control devices remotely. In this project, an ESP32 microcontroller hosts a simple web server that allows users to switch an LED ON and OFF through a smartphone browser.
The ESP32 comes with built-in Wi-Fi, making it ideal for IoT projects without requiring additional communication modules. By completing this project, students will learn about wireless networking, web-based control systems, embedded programming, and practical IoT applications.
This project is a perfect example of Grade 9 STEM Activities because it combines electronics, programming, and networking into one engaging hands-on experiment.
Watch the ESP32 WiFi Controlled Street Light Project Tutorial
Watch this step-by-step ESP32 WiFi Controlled Street Light Project tutorial to learn how to create a web-based LED control system using Arduino IDE, Wi-Fi communication, and an ESP32 microcontroller.
Table of Contents
What is ESP32?
The ESP32 is a powerful microcontroller designed for IoT and wireless communication projects. It includes built-in Wi-Fi and Bluetooth, making it much more versatile than traditional microcontrollers.
Features of ESP32
- Built-in Wi-Fi connectivity
- Built-in Bluetooth communication
- Multiple GPIO pins
- Low power consumption
- Fast processing speed
- Suitable for IoT applications
Because of these features, ESP32 is widely used in smart homes, automation systems, robotics, and wireless monitoring projects.
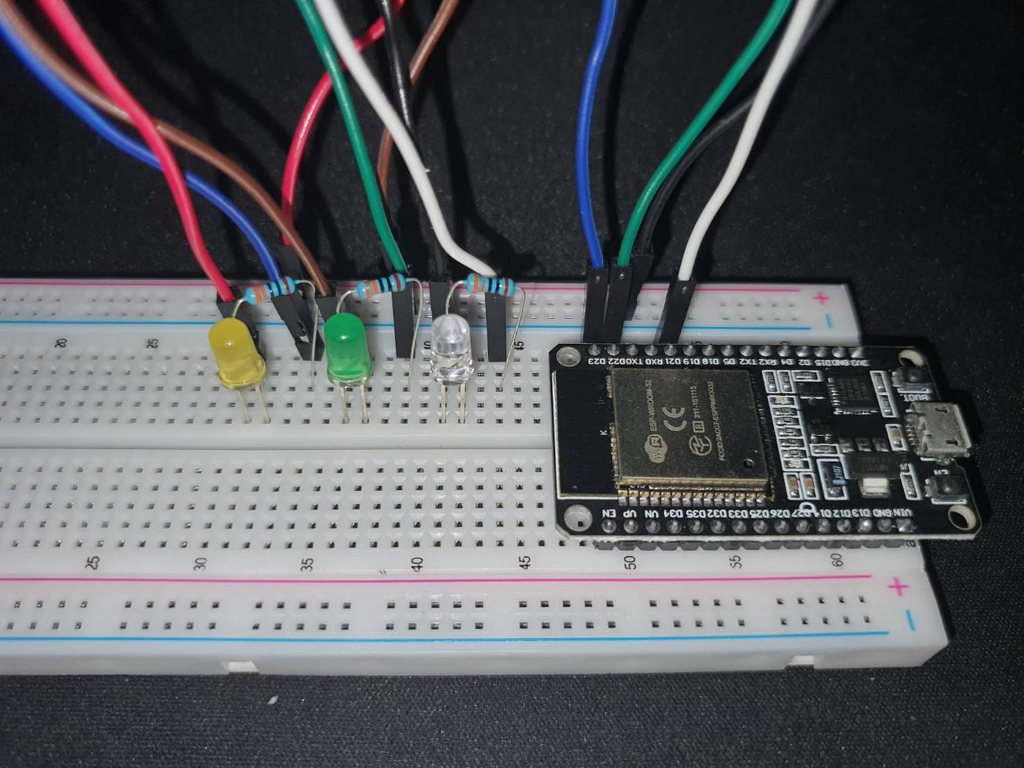
ESP32 microcontroller connected with LED, resistor, and breadboard for Wi-Fi control.
Components Required
To build the ESP32 WiFi Controlled Street Light Project, you will need the following components:
| Component | Quantity |
|---|---|
| ESP32 Development Board | 1 |
| LED | 1 |
| 220Ω Resistor | 1 |
| Breadboard | 1 |
| Jumper Wires | Several |
| USB Cable | 1 |
| Smartphone | 1 |
These components are inexpensive and commonly available in electronics kits.
Circuit Connections
Follow these simple hardware connection steps:
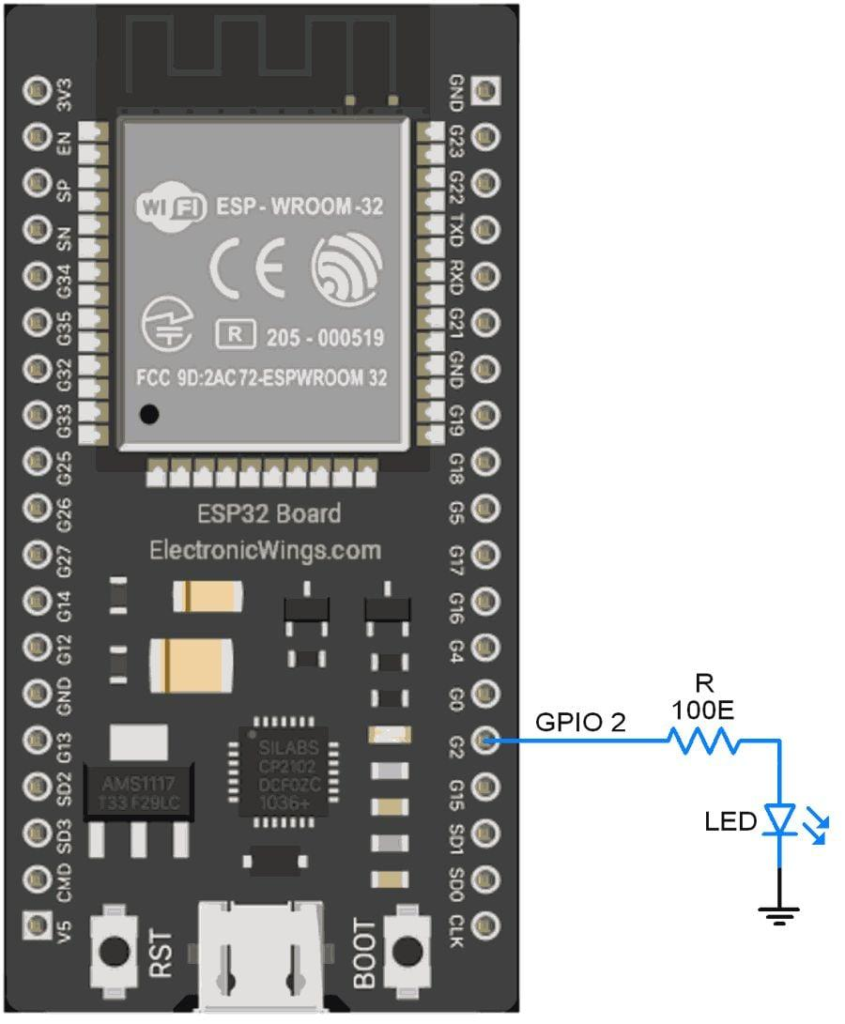
Step 1: Connect GPIO 2
Connect a jumper wire from GPIO 2 of ESP32 to a separate track on the breadboard.
Step 2: Add Resistor
Connect a resistor in series with the jumper wire.
Step 3: Connect LED
Insert the positive terminal (anode) of the LED after the resistor connection.
Step 4: Connect Ground
Connect the LED’s negative terminal (cathode) to the ESP32 GND pin using a jumper wire.
Circuit Connection Table
| Component | ESP32 Pin |
|---|---|
| LED Positive | GPIO 2 |
| LED Negative | GND |
| Resistor | Series with LED |
| USB Cable | USB Port |
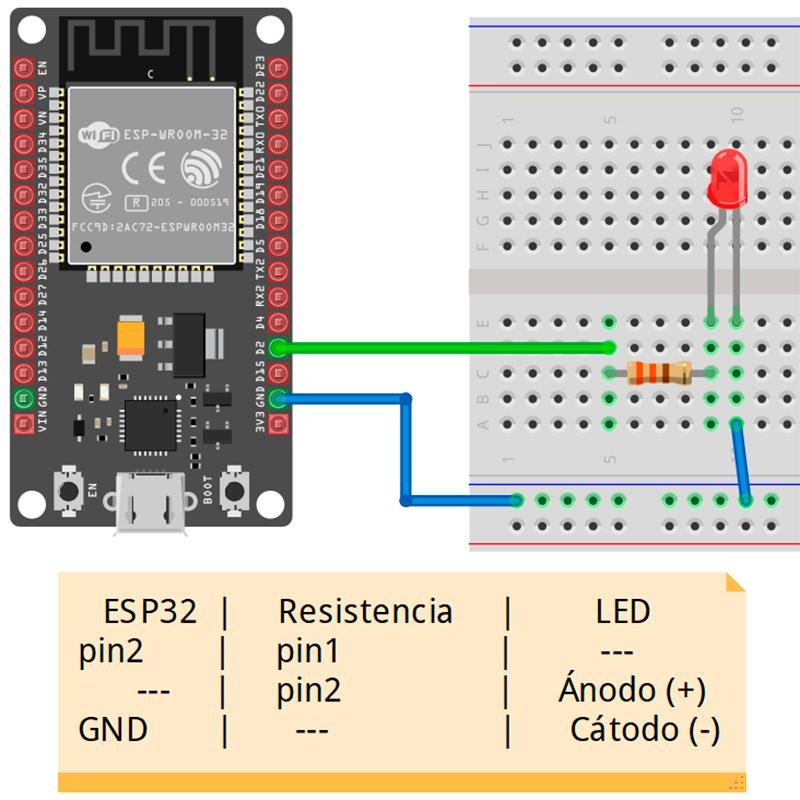
Circuit connections between ESP32, LED, resistor, and breadboard.
Working Principle
The ESP32 WiFi Controlled Street Light Project works using a web-based control system.
Input
A smartphone sends commands through a web page.
Processing
The ESP32 receives the command through Wi-Fi and processes it.
Output
The ESP32 turns the LED ON or OFF depending on the selected button.
This demonstrates how IoT devices can be controlled remotely over a wireless network.
Arduino Code
The Arduino IDE is used to program the ESP32.
Required Library
#include <WiFi.h>
The WiFi.h library allows ESP32 to connect to a wireless network and create a web server.
Important Code Functions
- Connect to Wi-Fi
- Create web server
- Display ON/OFF buttons
- Receive browser requests
- Control GPIO 2 output
Network Configuration
Before uploading the code, enter:
const char* ssid = "YourWiFiName";
const char* password = "YourPassword";
Replace these values with your actual Wi-Fi credentials.
Uploading Code to ESP32
After writing the program, follow these steps:
Select Board
Navigate to:
Tools → Board → ESP32 Dev Module
Select Port
Choose the COM port connected to your ESP32.
Upload Program
Click the Upload button.
Press Boot Button
When the upload process reaches completion, press the BOOT button once.
This allows the ESP32 to enter flashing mode and accept the code successfully.
Controlling the Street Light via Wi-Fi
Once the code is uploaded:
Step 1
Turn ON your smartphone Wi-Fi.
Step 2
Connect to the same network used by the ESP32.
Step 3
Open the ESP32 web server address in your browser.
Step 4
The webpage displays:
- ON Button
- OFF Button
Step 5
Press:
- ON → LED turns ON
- OFF → LED turns OFF
This creates a simple wireless street light control system.
Output and Results
After successful setup:
- ESP32 connects to Wi-Fi.
- Web server becomes active.
- Smartphone browser displays control page.
- LED responds instantly to button presses.
- Street light simulation works wirelessly.
This demonstrates a successful IoT-based lighting system using ESP32.
Applications of ESP32 WiFi Projects
The concepts learned in this project can be expanded into many real-world applications.
Smart Home Automation
Control lights and appliances remotely.
Smart Street Lighting
Automate and monitor public lighting systems.
Industrial Automation
Wireless control of machines and equipment.
Energy Management
Reduce power consumption using remote monitoring.
IoT Projects
Build connected devices that communicate through Wi-Fi.
Why Learn STEM Projects with RoboSiddhi?
At RoboSiddhi, students learn technology through hands-on experiments and real-world projects.
The ESP32 WiFi Controlled Street Light Project helps students understand:
- IoT fundamentals
- Wireless communication
- Embedded programming
- Electronics assembly
- Smart automation systems
Through project-based learning, students develop problem-solving, creativity, and technical skills needed for future careers in technology.
Frequently Asked Questions
What is ESP32?
ESP32 is a microcontroller with built-in Wi-Fi and Bluetooth used for IoT and automation projects.
Which GPIO pin controls the LED?
GPIO 2 is used to control the LED in this project.
Which library is required?
The WiFi.h library is required for Wi-Fi communication.
Why is the boot button needed?
The boot button allows ESP32 to enter programming mode during code upload.
How is the LED controlled?
The LED is controlled through a web page hosted by the ESP32 web server.
Is this project suitable for beginners?
Yes. This project is ideal for beginners and Grade 9 STEM Activities.
Conclusion
The ESP32 WiFi Controlled Street Light Project is an excellent beginner-friendly IoT activity that demonstrates wireless device control through a web interface. Using ESP32, students can learn about Wi-Fi communication, web servers, embedded programming, and automation technologies.
As a Grade 9 STEM Activity, this project provides valuable practical experience while introducing learners to the exciting world of Internet of Things applications. The concepts learned here can easily be expanded into advanced smart home, industrial automation, and smart city projects.