

Table of Contents
Introduction to Arduino LED Blink Using For Loop
The Arduino LED Blink Using For Loop project is one of the most engaging Grade 8 STEM Activities for students learning coding, electronics, and microcontrollers. This project demonstrates how a simple Arduino program can control an LED and make it blink a specific number of times using a for loop.
Programming is an essential skill in today’s technology-driven world. Through this activity, students learn how repetition works in coding and how software instructions can control hardware devices. The Arduino LED Blink Using For Loop project provides a practical introduction to embedded systems and automation.
By combining coding with electronics, students gain hands-on experience while understanding important programming concepts such as loops, variables, outputs, and timing functions.


What is a For Loop in Arduino?
A for loop is a programming structure used to repeat a block of code a specific number of times.
Instead of writing the same commands repeatedly, programmers use loops to make the code shorter, cleaner, and more efficient.
A typical Arduino for loop follows this structure:
for(int\ i=0;\ i<5;\ i++)
In this project, the loop runs five times, causing the LED to blink exactly five times.
For loops are commonly used in robotics, automation systems, games, simulations, and embedded programming projects.
Components Required
To build the Arduino LED Blink Using For Loop project, students need the following components:
- Arduino Uno Board
- LED (Light Emitting Diode)
- Resistor
- Breadboard
- Jumper Wires
- USB Cable
- Arduino IDE Software
These are beginner-friendly components commonly used in STEM and robotics education.


Understanding the Arduino LED Blink Using For Loop Project
The main objective of this project is to control an LED connected to Arduino pin 13.
The LED will:
- Turn ON
- Stay ON for 500 milliseconds
- Turn OFF
- Stay OFF for 500 milliseconds
- Repeat the process five times
This activity helps students understand how microcontrollers interact with external electronic components.
The Arduino executes the instructions line by line and repeats them according to the conditions defined inside the for loop.
Circuit Connections
The hardware setup for the Arduino LED Blink Using For Loop project is simple and ideal for beginners.
LED Connections
| Component | Connection |
|---|---|
| LED Anode (+) | Arduino Pin 13 through resistor |
| LED Cathode (-) | Arduino GND |
| Resistor | Between LED and Pin 13 |
Why Use a Resistor?
The resistor limits the current flowing through the LED.
Without a resistor:
- The LED may burn out.
- Excess current could damage the circuit.
Using a resistor ensures safe and reliable operation.


Programming the LED Blink Project
The program starts by declaring the LED pin.
The LED pin is assigned as:
int\ LED=13
Inside the setup function, the LED pin is configured as an output.
pinMode(LED,OUTPUT)
The loop function contains the blinking logic.
The Arduino repeatedly turns the LED ON and OFF using digitalWrite commands and timing delays.
The LED blinks exactly five times because the for loop executes five iterations.

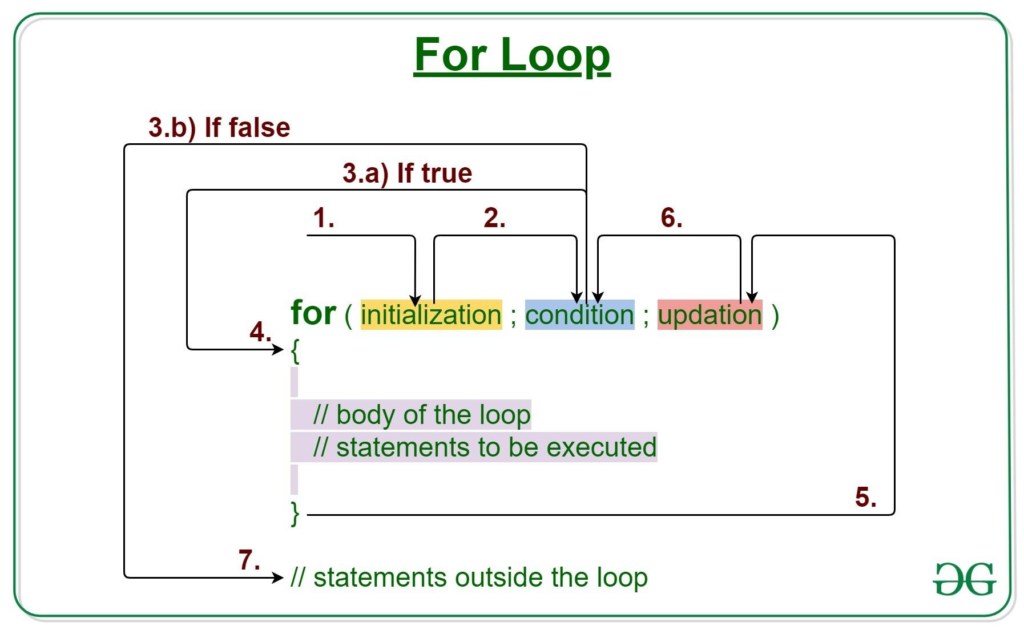
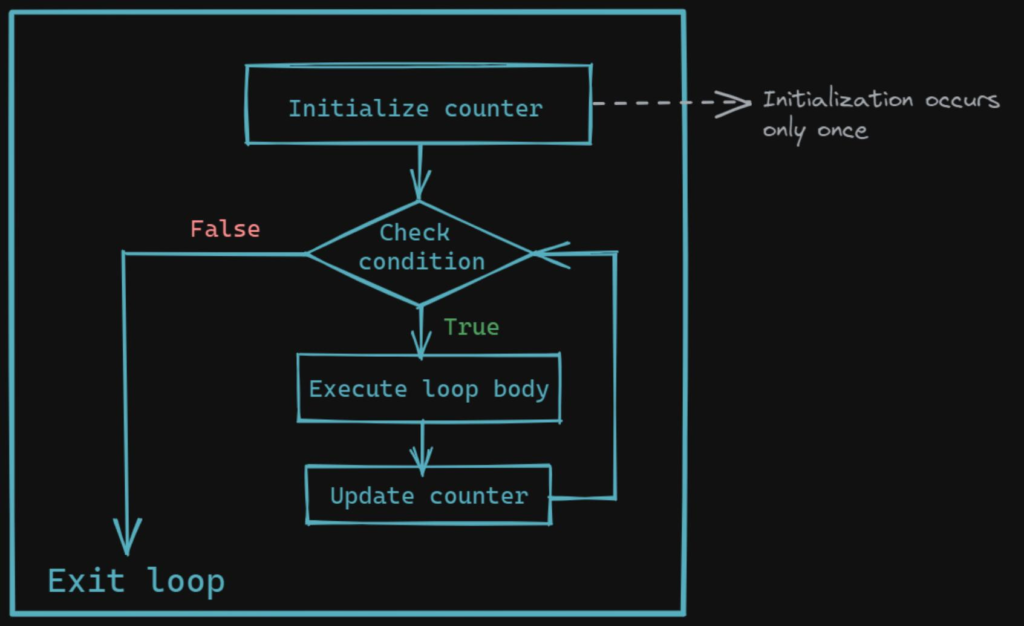
How the For Loop Works
The for loop consists of three important parts:
Initialization
The loop begins with:
- i = 0
This creates a counting variable.
Condition
The condition checks whether:
- i < 5
As long as the condition remains true, the loop continues.
Increment
The statement:
- i++
increases the value of i by one after every iteration.
The sequence becomes:
0 → 1 → 2 → 3 → 4
After reaching 5, the condition becomes false, and the loop stops.
This ensures the LED blinks only five times.
Benefits of Learning Arduino Programming
The Arduino LED Blink Using For Loop project offers several educational advantages.
Improves Logical Thinking
Students learn how programs follow logical sequences.
Builds Coding Skills
The project introduces variables, loops, outputs, and timing functions.
Encourages Problem Solving
Students learn how to identify and correct programming errors.
Introduces Embedded Systems
The project demonstrates how software interacts with hardware.
Supports STEM Education
Students develop practical skills in Science, Technology, Engineering, and Mathematics.
Real-World Applications of Loops
Loops are one of the most important concepts in programming.
They are used in:
Traffic Light Systems
Traffic signals repeat sequences continuously.
Robotics
Robots perform repetitive actions using loops.
Industrial Automation
Machines execute repeated tasks efficiently.
LED Display Systems
Animations and patterns rely heavily on loops.
Smart Devices
Modern electronics continuously monitor sensors using repeated program cycles.
Understanding loops helps students prepare for more advanced coding and robotics projects.
Grade 8 STEM Activities with Arduino
After completing the Arduino LED Blink Using For Loop project, students can explore additional Grade 8 STEM Activities such as:
- Traffic Light Simulation Using Arduino
- Smart Door System Using Ultrasonic Sensor
- Servo Motor Control Project
- LDR Sensor Automation System
- Smart Street Light Project
- ESP32 Automation Projects
- Obstacle Detection Robot
These projects help students build confidence in coding, electronics, and robotics.
RoboSiddhi STEM Learning Programs
RoboSiddhi promotes hands-on STEM education through practical robotics and coding projects. Students gain real-world experience by building innovative solutions using Arduino, ESP32, sensors, and automation technologies.
Through project-based learning, students develop creativity, critical thinking, teamwork, and engineering skills. Activities like Arduino LED Blink Using For Loop help learners understand core programming concepts while making STEM education exciting and interactive.
RoboSiddhi STEM programs are designed to prepare students for future careers in technology, robotics, artificial intelligence, and engineering.
Frequently Asked Questions
What is Arduino LED Blink Using For Loop?
It is a beginner Arduino project where an LED blinks a fixed number of times using a for loop.
Why is pin 13 used?
Pin 13 is commonly used for LED projects and is available on most Arduino Uno boards.
What is the purpose of a for loop?
A for loop repeats instructions a specified number of times.
Why are delays used?
Delays control how long the LED stays ON and OFF.
Is this project suitable for beginners?
Yes. It is one of the best Grade 8 STEM Activities for introducing programming and electronics.
Conclusion
The Arduino LED Blink Using For Loop project is an excellent beginner-friendly activity that teaches students how programming can control electronic devices. Through the use of loops, timing functions, and digital outputs, learners gain a strong foundation in coding and embedded systems.
As one of the most effective Grade 8 STEM Activities, this project combines programming and electronics in a practical and engaging way. Students not only understand how a for loop works but also discover how software and hardware interact to create real-world technological solutions.